Yesterday we shared an easy cat mask craft. To expand our pretend play options we also made this mouse mask craft.

Materials for Mouse Mask
- Plain party masks-Ours came in a pack from Walmart. They are cardboard.
- Felt in two colors of your choice
- 2 chenille stems trimmed into thirds
- Hot glue gun
- Scissors
Assembling the Mouse Mask
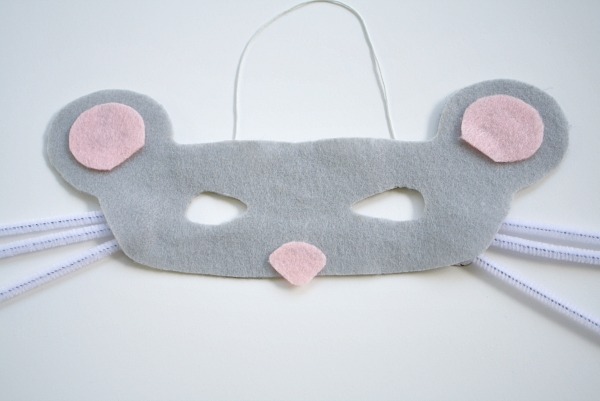
- Cut a basic mouse face out of one color of felt. I drew an oval that was just a bit larger than the cardboard mask and added circles to the top corners.
- Lay the cardboard mask on top of the felt and trace ovals in the appropriate spots for eyes. Cut those out and test to make sure your child can see. If not, adjust accordingly.
- Cut the ears and nose out of the second color of felt.
- Hot glue the chenille stems to the front of the cardboard mask. Placing them on the front of the mask will keep them from poking kids and hide them once the felt is glued on. (I accidentally did this before I took the “before” picture so they are already assembled in the first photo above.)
- Hot glue the mouse face to the front of cardboard mask on top of the chenille stems.
- Hot glue the ears and nose to the mouse face.
- Put it on and squeak away!

What Are We Using Our Mouse Mask For?
There are a ton of opportunities for play and silliness with these little masks. Here are a few ideas:
- Use them for pretend play
- Act out favorite rhymes or songs that involve mice
- Add a couple accessories to make an easy DIY costume
- Act out a story (one you’ve read or one you make up together)
- Play games-Tomorrow we’ll be sharing an easy one using this mask and our cat mask.
This post has been shared at some of these fantastic link parties.
Sheena@ http://www.thekeeperofcheerios.blogspot.com/
oh my gosh how cute! This is just to adorable i love it! Thank you for sharing
Now following you
Sheena @ The Keeper of Cheerios
Shaunna Evans
I’m so glad you like it, Sheena! Thanks for following along.