Last Updated on December 3, 2021 by LSchatz
Hi there! I’m so excited to be welcoming a new contributor to Fantastic Fun and Learning. Katrina Guevara is a long-time friend, an experienced educator, and a super organized–yet very practical–mom of 2. You can read more about Katrina on her bio page. Here on Fantastic Fun and Learning Katrina will be bringing you all sorts of crafts, sanity saving organizational tips, and kids in the kitchen posts. Today she’s kicking off with a quick and easy dinner idea that her kids make.
Enjoy!
~Shaunna
___________________________________________________________________

Affiliate links included.
Ham and Cheese Roll-Ups
Want an easy dinner idea? I find it easy to have my kids be in charge of making dinner! Seriously. I observe and move the tray into and out of the oven, but that is my only job. Even better is that there are very few ingredients, multiple variations, almost no clean up, and my kids eat more on nights they cook. This is probably because they think that their dinners are the most amazing creations! As a busy mom of two, I agree!
Last night they chose one of their favorite dinners. They made Ham and Cheese Roll-Ups.
The girls wash their hands to make dinner. Then they go to the fridge and pull out the 3 ingredients: pizza crust, shredded cheddar cheese, and ham. I also have them grab the aluminum foil & cooking spray.

{Full disclosure: My daughters are 5 & 7. They started helping out in the kitchen last year. It takes a few times to model & teach them how to do some of these tasks, but it is well worth the time. Now they love to be in charge!}
Step 1: Preheat the oven at 400. Wrap a baking sheet in aluminum foil and spray with nonstick cooking spray.
Step 2: Open the pizza dough and spread it on the lined cookie sheet. (Sometimes these cans cooperate and sometimes I help. Last night I had to get it to “pop” before my 7 yr old could finish unraveling it.)

Step 3: I put it in the oven for about 5 minutes. They like to use a timer.
Step 4: I lift the foil out of the cookie sheet and lay the crust on the table. No hot tray to burn themselves on. Foil cools rather quickly and the pizza dough isn’t too hot. I let it sit for a minute to be sure.
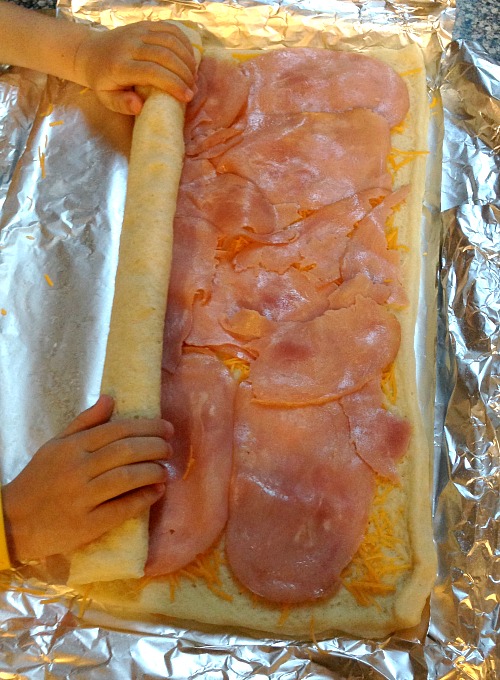
Step 5: Kids add toppings. There are a lot of different ingredient combinations. Sometimes they make patterns on the bread. I let them get creative! No need to rush.

Step 6: Have your child roll up the dough. Place seam on bottom and put roll-up in center of foil. Return it to the pan and into the oven for about 10-15 more minutes, until the top is golden brown.
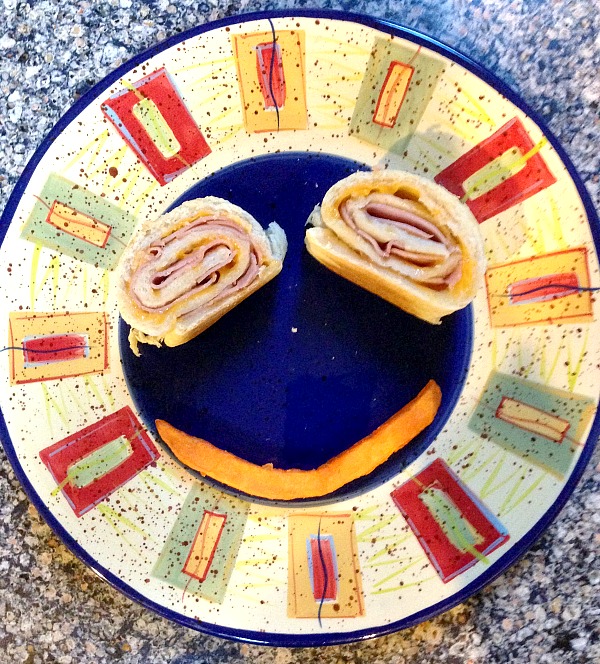
Step 7: Remove from oven and cool. Cut. Serve. Enjoy!!
We served sweet potato fries with our rolls tonight. It was as easy as my daughter pouring frozen fries onto a pan and then I placed them in the oven.
Other variations that we love include:
- Chicken pieces and cheese slices
- Chicken pieces, ham, swiss cheese and honey mustard (Cordon Blue Style)
- Ham, onions, peppers, and cheese (Western Style)
- Chicken, onions, peppers, and cheese (Chicken Philly Style)
- Turkey and cranberry spread
Ham and Cheese Roll-Ups
Equipment
- Aluminum Foil
- Cooking Spray
- Baking Sheet
Ingredients
- Pizza crust (We like Pillsbury canned dough)
- Shredded cheddar cheese
- Deli sliced ham
Instructions
- Preheat the oven at 400. Wrap a baking sheet in aluminum foil and spray with nonstick cooking spray.
- Open the pizza dough and spread it on the lined cookie sheet.
- Put it in the oven for about 5 minutes. Let your kids help by using a timer!
- Lift the foil out of the cookie sheet and lay the crust on the table. No hot tray to burn themselves on. Foil cools rather quickly and the pizza dough isn’t too hot. I let it sit for a minute to be sure.
- Let the kids add toppings. There are a lot of different ingredient combinations. Sometimes they make patterns on the bread. I let them get creative! No need to rush.
- Have your child roll up the dough. Place the seam on the bottom and put the roll-up in the center of your foil. Return it to the pan and into the oven for about 10-15 more minutes, until the top is golden brown.
- Remove from oven and cool. Cut. Serve. Enjoy!
Michelle
Can I make this ahead (after cooking the 5 minutes).
Shaunna Evans
I haven’t tried making them ahead, but I think you could stop after you roll them up and then set them aside until you are ready to pop in the oven for the final 10-15 minutes.
Tammy J Reyman
We just Love 💘 this recipe and have made it multiple times. 😋 Using Rotisserie Chicken, Salami & Pepper Jack Cheese tonight. Great dinner served with Fresh Fruits as a last minute dinner, when you forget to take out something for supper.
Shaunna Evans
Ooh, Tammy! That sounds like a very yummy twist on the recipe. I think my kids will love that! Thanks for sharing.
Carrir
Can I skip the first 5 min bake step?
Shaunna
Hi Carrir,
Putting it in the oven for the first five minutes sets the dough and makes it easier to work with. It would be very sticky if you tried to roll it with toppings while completely uncooked.
Happy Cooking!
Shaunna
Tina
Would like a pic after they were done……
Shaunna Evans
The picture on the plate is a photo after they are done and sliced. In general you’ll want to bake until the dough is a light golden brown.
Stacy
Has anyone tried this with crescent dough instead?
Shaunna Evans
We haven’t, but I bet it would be delicious. I’d use the crescent dough sheets.
Traci
I juśt made this and it was amazing! ? I had a package of regular and not thin pizza dough so I was a little worried it wouldn’t bake through, I added about 3 minutes and also made sure to spread it out as well as I could on the baking sheet first. My tube of dough sat out for about 15 min to soften up and was nice and pliable… I pre-sliced mine as well… served with mustard for dipping; excited to do the pepperoni ones with marinara next time! Great recipe, thx! ?
Shaunna Evans
So glad you loved the recipe! Thanks for the feedback 🙂
Sam Phillips
I think this would be a great bite size appetizer also!!! I would probably prefer Crescent Roll Dough (& would bake at the temp on the pkg, & eliminate 1st 5 min bake). I will try both & try to come back & let you know which I preferred.
Shaunna Evans
Sounds like a great idea! Can’t wait to hear how it turns out, Sam.
Deborah
Thanks for the idea! I think we’ll try something similar this week.
Tim
@ LaRae, it says “Step 1: Preheat the oven at 400.”
Tim
But if it didn’t say, you could look at the cooking instructions on the pizza crust package 🙂
LaRae Shipper
Looks fun, it would’ve been nice if we were told what temperature to cook it at, I’m assuming 350
Shaunna Evans
Oops! We bake ours at 400. Updated the directions. Sorry about that!
Marcia
I assume the oven is set to 350 degrees?
Jody Hackley
These look great! Have you tried to freeze these for a quick lunch later in the week?
Shaunna Evans
We haven’t tried it yet, but I think it would work. Maybe we’ll give it a try this school year!
Ann Daniels
The recipe did not indicate the oven temperature. What’s the temperature please?
Thanks!
Ann
Shaunna Evans
Step 1 is to preheat the oven to 400F
cresha
How come there is no temp mentioned
Shaunna Evans
Step 1 is to preheat the oven to 400F
james pappe
What temp do you set the oven at?
Shaunna Evans
Step 1 is to preheat the oven to 400F
maryanne @ mama smiles
This is a fun and easy snack that my kids would enjoy!
Katherine Collmer
This is a great cooking idea for children! Cooking is such a functional learning experience that hones so many skills! Thank you for sharing it. I will do the same!
Rachael :: Nothing if Not Intentional
Sounds YUMMY! Can’t wait to try these with my girls!