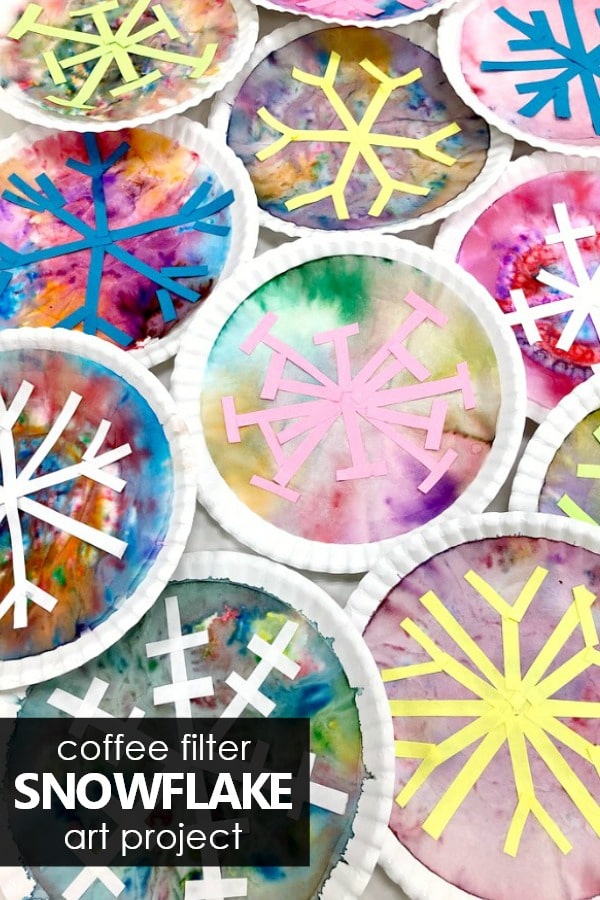
Engage even the most reluctant little artists with this fun twist on making coffee filter snowflake art with kids.
As an art teacher to young learners, my goal is to reach and engage all of my students. This can be a daunting task considering children have various interests, strengths, abilities, sensory sensitivities, and/or special needs. It’s always fascinating to see what young artists gravitate towards and also what they dismiss.
Some children love to paint and light up when they see the brushes and bottles of paint set out on the table. Others love a clay day and will roll and mold with glee! Many are happy to experiment with non-traditional art materials through creative play, sensory art, or process art.
However, each year I always have a few students who, for various reasons, are my most challenging to engage. I’m left searching for something that will inspire and get them enthused and eager to create. Through trial and error over the years I’ve discovered that incorporating water play with art has been a lifesaver!
Having students squeeze, squirt, and spray water is often my go-to activity! It incorporates action and play into the art-making process. Today we’ll explore this idea and create coffee filter snowflakes. So, let the faucet run and don’t be afraid to get a little wet!
Coffee Filter Snowflake Art Project for Kids

GET A FULL WEEK OF SNOWFLAKE THEME ACTIVITIES IN OUR PRESCHOOL SNOWFLAKE LESSON PLANS

Snowflake Science and Art
I love the magic and excitement of snow! Ask any teacher, if it’s snowing during school hours students have their eyes glued to the windows and are sure to tell you it’s snowing!
Let’s embrace that excitement with a snowflake art project. Each snowflake is unique and your child’s finished piece of art will be as well!

Keep these facts in mind when creating and discussing snowflakes during snowflake theme activities:
- Snowflakes are tiny droplets of ice.
- Snowflakes are symmetrical.
- Snowflakes are hexagonal in shape meaning they have six points.
- Snowflakes are not white. They are actually clear.
Materials for Coffee Filter Snowflakes
- Coffee Filters
- Markers
- Paper Plates
- Construction Paper (I used Tru-Ray Fluorescent colors)
- Glue
- Scissors
- Water
- Spray Bottle
- Eyedropper
Step By Step Directions:
1. Scribble and Draw!

Secure the coffee filter to the paper plate with glue and begin to draw on the filter with markers. You are free to make any marks you like including lines, shapes, doodles, scribbles, and dots. Coloring in various areas is also an option. Make sure to cover the majority of the filter, use a variety of colors, and overlap colors and designs to add interest.
2. Spray Away!
Spray water using a spray bottle. The marker will begin to bleed and run. Experiment using a little or a lot of water to achieve various results.

3. Squeeze and Squirt!
Try using an eyedropper to add water and achieve more isolated results. Aim, squirt, and watch as the colors blend together.
4. Cut and Create!

After the water dries cut strips of paper in various lengths and glue them to the filter to create a snowflake. Create symmetrical, six-pointed snowflakes or make imaginary flakes. If your child is struggling have him or her begin by creating an X with the strips or a plus sign.
I’d love to see your snowflake creations, so please tag @fantasticfunandlearning and @youngschoolartwithmr.g on Instagram.

I hope you enjoy this art activity that combines process art and crafting with water. Your child is sure to remember the magic blending and bleeding process as the colors mix and swirl together.
If you’re children enjoy this activity and you’re looking for more winter art project inspiration visit this collection of snowflake art project ideas.
CONNECT WITH VIN GIANNETTO
Learn more about Vin here on his author bio page. Follow along with him on Facebook at Young School Art with Mr. Giannetto and on Instagram @youngschoolartwithmr.g for art project ideas.
MORE ART AND CRAFT PROJECT IDEAS FROM VIN
/
Winter and Winter Holiday Art Projects for Kids
Click on the images below to see the full tutorial for each art project.
Winter and Winter Holiday Art Projects for Kids
Click on the images below to see the full tutorial for each art project.
Get a Full Week of Snowflake Fun and Learning
Save time and get right to the playful learning with our printable lesson plan sets. Each set includes over 30 playful learning activities related to the theme, and we’ve provided different versions for home preschool families and classroom teachers so all activities are geared directly toward your needs.

Use snowflakes as inspiration for a week of learning and play with this preschool snowflake theme lesson plan set full of hands-on math, reading, and science activities. Watch this short video to see just a few examples of the types of activities and printables included in this set:
This lesson plan set also includes:
- 10 Little Snowflakes Song Chart and Pieces
- Snowflake Beginning Sounds Activity for Sounds /s/, /n/, /o/ and /w/ (in color and b/w)
- Fall Snowflakes Phoneme Segmentation Mats (4 versions)
- Count the Snowflakes Emergent Math Reader for Numbers 1 to 10 (3 versions in color and b/w)
- Snowflake Names Activity and A to Z Upper and Lowercase Letter Snowflakes (in color and b/w)
- Snowflake Upper- and Lowercase Letter Matching Puzzles (in color and b/w)
- Snowflake Vocabulary Word Cards (in color and b/w)
- Snowflake Roll and Color Graphing (in color and b/w)
- 1-20 Snowflake Counting Mats with Blank Version Included (in color and b/w)
- Snowflake Number Cards for 0-35 (in color and b/w)
- Snowflake Patterning and Sorting Cards (in color and b/w)
- Snowflake Shape Game (in color and b/w)
- Do You Like Snow? Class Graphing Header and Voting Cards
- My Snowflake Science Journal with pages for 7 science activities (in color and b/w)
- 21 Real Snowflake Photographs
GET YOUR LESSON PLANS

Also available on Teachers Pay Teachers


Katrina
Leaving this comment in case it helps someone else with this activity. We had the same experience as Lauren, where the colors did not bleed together like the photos. I did some experimenting and discovered that the newer Crayola washable markers, labeled “ultra washable” did not bleed together very much. In fact some of the colors just disappeared altogether. The older markers I had that are the original washable markers did bleed together pretty well. It took a lot of water and it still didn’t look exactly like the photos but much more mixing of colors. Also they got more mixed the longer they sat with all of the water on them. So don’t blot away the puddles of water.
Lauren
We tried this activity and it was a bust. The colors didn’t bleed like in your photos. I even tried it myself, two different “techniques” with the density/design/overlapping of the markers. Is there something we might have missed? My girls still had fun, it just didn’t turn out. We’d done tons of your actives and this was the first one that didn’t work out.
Shaunna Evans
That is so strange! I’ve never run into this with any coffee filter art projects. I wonder if there was a waxy film on the coffee filters? Or maybe the markers were not washable? It’s a pretty tried and true art technique for littles, so now you’ve got me curious as to what went wrong.