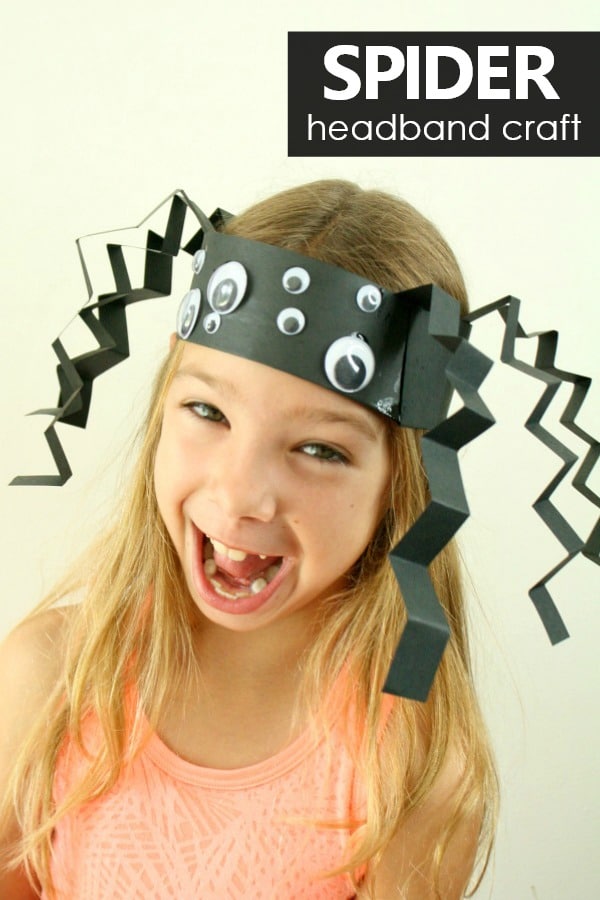
This easy spider headband craft for kids is always a favorite during our S is for Spiders theme. Children love making their own silly spider hats and wearing them as they crawl, sing, and pretend to be spiders.
This hands-on spider craft is a fun choice for a preschool or kindergarten Halloween activity, a letter S craft, or a simple life science lesson. As children make their spider headbands, they can practice counting eight legs and eight eyes while strengthening fine motor skills through folding, gluing, and assembling.
Easy Spider Headband Craft for Kids
Before making the spider craft, we read a few nonfiction books about spiders and discuss some basic spider facts. We focus mainly on the facts that spiders have eight legs and that most spiders have eight eyes. Children then use those facts to create their own spider headband.

FIND EVEN MORE SPIDER THEME ACTIVITIES IN OUR PRINTABLE LESSON PLANS
Spider Headband Craft Video Tutorial
Watch the video tutorial below to see how to make this paper spider hat step by step.
Note: This post was originally published in 2012. Updated photos and a video tutorial were added in 2018 to make the spider craft instructions easier to follow.
Spider Headband Craft Supplies
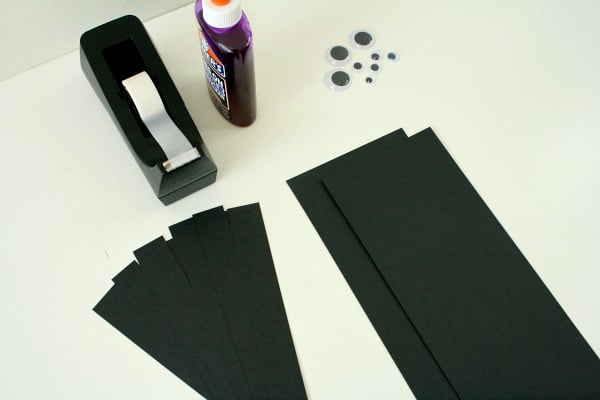
You only need a few basic craft supplies to make these spider hats. Before beginning, prepare enough paper strips and eye pieces for each child.
- Black construction paper
- Scissors
- Glue
- Stapler
- Large and small googly eyes or paper eyes
- Optional nonfiction spider books
How to Make a Spider Headband Craft
Step 1: Prepare the Spider Headband and Legs
Begin by cutting long strips of construction paper to fit around each child’s head. If your paper strips are not long enough, glue two pieces together. Joining two strips can also make the finished spider headband a little stronger.
Next, cut eight long, thin paper strips for each child. These strips will become the spider’s legs.
Ask children to count their paper strips and make sure they have exactly eight. This is an easy way to include number recognition and counting practice in the spider craft.

Step 2: Accordion-Fold the Spider Legs
Now it is time to fold the spider legs. We stacked two paper strips on top of one another and folded them at the same time. This saved time and helped prevent children from becoming tired of folding before all eight legs were complete.

Model how to fold the paper forward, flip it over, and fold again. Continuing to fold and flip creates an accordion or zigzag shape instead of a rolled paper strip.
Accordion folding is excellent fine motor practice. Younger children may need help making the first few folds or keeping their paper strips lined up.
Step 3: Attach All Eight Spider Legs

Lay the long headband strip flat. Leave an open space in the center so the paper does not cover the child’s eyes when the headband is worn.
Add four dots of glue to one side of the strip and four dots of glue to the other side. Attach one accordion-folded leg to each glue dot so the spider has four legs on each side and eight legs altogether.
Fold the paper strip over lengthwise and seal it with glue. This helps secure the legs between the layers of paper and makes the spider hat more durable.

Step 4: Count and Sort Eight Spider Eyes
While the spider legs are drying, invite each child to choose four large eyes and four small eyes. Together, the two sets create eight spider eyes.
Before attaching the eyes, use them for a quick preschool math activity. Put all the large eyes together and count them. Then count the small eyes. Finally, combine both groups and count how many eyes there are altogether.
This simple activity gives children an opportunity to practice:
- Counting to eight
- Sorting by size
- Comparing big and small objects
- One-to-one correspondence
- Using early math vocabulary

Step 5: Glue the Eyes onto the Spider Hat
Flip the headband over and glue all eight eyes onto the front. Children can arrange the eyes in rows, pairs, or any creative pattern they choose.
Allow the glue to dry for a few minutes so the eyes do not slide off when the headband is lifted.

Step 6: Fit and Staple the Spider Headband
Wrap the paper strip gently around each child’s head to find the correct size. Remove the headband and staple the ends together. An adult should complete the stapling step.
I like positioning the headband so the folded spider legs extend upward from the top. The bouncing accordion legs make the finished spider hats especially silly and fun to wear.

Learning Activities to Try with the Spider Hats
After making the headbands, encourage children to use them during music, movement, dramatic play, or a spider science lesson.
Try one or more of these spider-themed extensions:
- Crawl around the room and move like spiders.
- Act out “The Itsy Bitsy Spider.”
- Count the eight legs and eight eyes on each headband.
- Compare the colors, patterns, and eye arrangements children used.
- Read a nonfiction spider book and identify facts shown in the craft.
- Use the headbands during a Halloween parade or classroom celebration.
- Practice saying the beginning sound in the words spider, silly and spooky.
Skills Practiced with This Preschool Spider Craft
This simple Halloween spider craft combines creativity with several early learning skills.
- Fine motor development
- Accordion folding
- Cutting and gluing
- Counting to eight
- One-to-one correspondence
- Sorting and comparing sizes
- Following multistep directions
- Learning basic spider facts
- Creative expression
- Letter S recognition
Ways to Adapt the Spider Headband Activity
You can easily modify the craft to fit the ages, abilities, and available time of your group.
- For toddlers: Pre-fold the legs and provide large paper eyes.
- For preschoolers: Let children count, fold, glue, and arrange their own pieces.
- For kindergarten: Ask children to write the number 8 or a spider fact on the inside of the headband.
- For a quicker craft: Use straight paper legs instead of accordion-folded legs.
- For more creativity: Offer different colors of paper, stickers, crayons, or patterned eyes.
- For a science connection: Compare the spider craft with an insect and discuss the differences.
GET A FULL WEEK OF SPIDER THEME ACTIVITIES
Save planning time and get right to playful learning with our printable spider lesson plan sets. Each set includes more than 30 hands-on learning activities related to the spider theme.
We have created different versions for home preschool families and preschool classroom teachers so the activities and instructions are tailored to your learning environment.

Children can learn facts about real spiders and use toy spiders to explore math, literacy, science, and fine motor concepts in this complete preschool lesson plan pack.
Watch this short video to see a few examples of the hands-on activities and printable resources included in the set:
- My Spider Emergent Reader
- Spider Babies Fine Motor Activity Mat
- Spider Patterning Task Cards
- Spider Roll and Add Counting Game
- Spider Letter Building Mat
- Itsy Bitsy Spider Story Sequencing Pieces
- Spider Calendar or General Number Cards
GET YOUR LESSON PLANS
Preschool Classroom Spider Theme Lesson Plans (in our shop or on TpT)
Last Updated on July 19, 2026 by Shaunna Evans
Jen
We just made these today with my 3.5 and 5 year old – they are obsessed! Thank you for the idea 🙂
Shaunna Evans
Yay! I’m so glad they had fun with them 🙂
Eowyn Dernhelm
This was a great craft! I did it with my girls today and they had a great time. Thank you!
Shaunna
That’s great to hear! I appreciate the feedback.
Shana
Can’t wait to do this craft with my younger daughter’s class. Thanks, Shana
Thomps
Very cute! Could you tell us about the size of the strips and the bands for the heads. I’m trying to cut things ahead of the party.
Thanks
Shaunna Evans
Typically I make the “leg” bands about 1 inch wide…for length just go with whatever the length is for the size of the paper you have. I prefer longer legs so I often used 9 x 12 paper.
For the “body” bands I like to make a 2-3 inch strip (and we fold it over to hide the glue and make the legs more secure). Depending on the size of the paper you have available and the age of your group (size of their heads), you may need to attach to body bands to make them fit.
It takes a little trial and error but once you’ve got one template, you’ll be set.
Brooke Roberts
Everything looks so much better with googly eyes! I love these!
Dianne
Hi Shaunna!
Thank you so much for this adorable craft! I used it in my classroom and wrote about it on my blog! I even gave you credit and linked back to this post! You can check it out here: http://aclassroomoncloudnine.blogspot.com/2016/04/spooky-sneaky-spiders.html
Thanks again for the inspiration! If you ever want to guest post for each other or collaborate on anything, please don’t hesitate to reach out!
Thanks!
-Dianne
Shaunna Evans
I’m so glad you liked it, Dianne! It’s really one of my favorite learning crafts. Kids always have so much fun with their spider hats! I really appreciate how you shared the craft and credited this post.
You’re site is adorable. If you ever have any ideas for collaborating let me know.
Shaunna
Bargain Babe
Cool and easy Halloween costume! I linked to your tutorial today and hope you don’t mind – to get lots of eyeballs I grabbed a pic from this page.
Thanks again for this awesome idea. My girls LOVE goggly eyes.
Shaunna Evans
Thank you! What a fun collection of Halloween costume ideas. Thanks for including us.
And we love googly eyes, too!
maggy, red ted art
Those spider headbands are CUTE (never thought I would say that about spiders, but they are!!)
Thank you for sharing on Kids Get Crafty!
Maggy
Shaunna
Thanks so much! And thank you for hosting.
Pinkoddy
This is absolutely adorable. And spiders are about so much right now it would be fitting even now that halloween has passed. Thanks for sharing.
Shaunna
Thank you! It is a fun craft that really can go along with many different topics. Definitely fun to use when acting out nursery rhymes…Itsy Bitsy Spider and Little Miss Muffet. It is also great for learning some simple facts about spiders. I am glad you like it!