A while back I stumbled across this bleeding tissue paper art technique tutorial from Bloom Bake Create, and I’ve wanted to try making bleeding tissue paper art as a process based art activity for the girls for a long time. While we were home sick trying to get everyone healthy again, I set it up as an invitation to create. Not only was a it a great distraction, the finished product is gorgeous!
 Materials
- Bleeding Art Tissue-Regular tissue paper will not work. The package must say “bleeding art tissue.”
- Watercolor Paper-We used watercolor paper for this project, but have also been successful using heavy cardstock for similar projects in the past.
- Spray bottle filled with water
- Work surface-We used cardboard so we could recycle it when finished.
See it in Action
Please be sure to visit the original tutorial from Bloom Bake Create for some great tips and additional details. Below I am just sharing a few details specific to working with children.
Step-by-Step Tutorial for Bleeding Tissue Paper Art

Lovey was very eager to get started the second she saw the invitation waiting. She immediately started tearing the tissue paper into small pieces and placing them on the paper. Tearing is excellent fine motor practice!

After she was please with her creation she started to spray the tissue paper with water. She sprayed and sprayed until she was happy with the amount of water. Working with a spray bottle is also terrific for fine motor development!
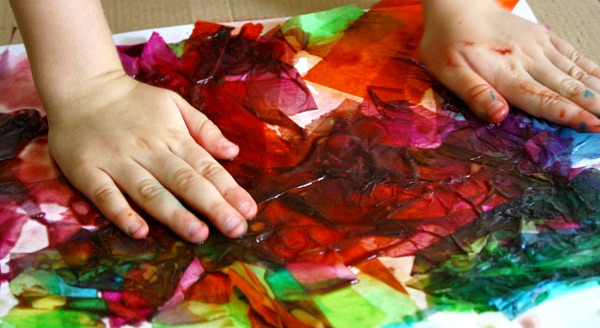
Next she patted down the paper. This did stain her hands for the rest of the day, but it was gone after bath time. We did experiment with a couple of ways to limit the staining, so if that’s a concern check out the alternate approach in this fall tree art project.

After Lovey was done patting down the paper we left it to dry.
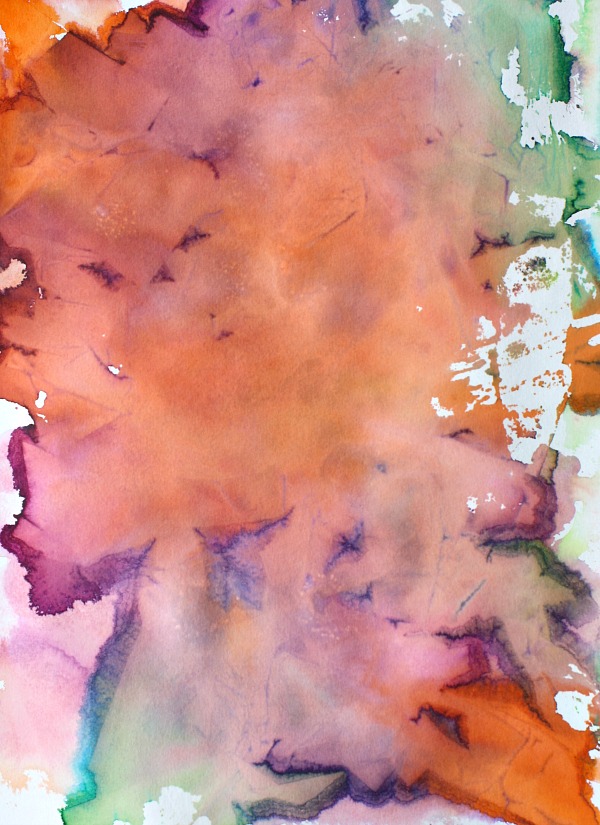
I wish I had a picture of the look on her face when she removed the dry paper bits and revealed this beautiful piece of artwork underneath. It was priceless, and it made her eager to make more tissue paper art creations. Stop back tomorrow to see what we created next!
In the meantime I found a couple other bleeding tissue art activities that might inspire you. I always love to see how different people approach different projects, and each of these methods is a bit different. Enjoy!
Bleeding Tissue Paper from Housing a Forest
Tissue Paper Bleeding Art from The Imagination Tree

amber b
ha! i was hopping on here to ask what brand of TP you used bc our attempt was a flop…that’s what i get for skimming through the post – now i’m on the hunt for bleeding tissue paper! can’t wait to try it a second time 😉
Shaunna Evans
I completely understand! I knew I needed bleeding tissue paper, and I still tried regular “just to see.” Yep, flop! Hope your second attempt is more fun. 🙂
Ann @My Nearest and Dearest
My little Peanut absolutely loves using spray bottles. And what a beautiful result! Another one of your activities that I’ll be adding to my must-do list!
jwg
If you add a tiny bit of white vinegar to the water you get more intense colors. Also, wet the kids hands and sprinkle on baking soda and have them rub their hands together as if they were washing with soap. Most of the color will be gone.
Shaunna
Bless you! Thank you for those great tips! We’ll definitely have to try that next time.
Ruth
really appreciate your tips
Emm
This comes out looking so awesome – and my 4-year-old loves anything that uses a spray bottle! lol. Do you get that tissue paper at a craft store? I’ll be keeping my eyes open for it next time I’m there!
Shaunna
Spray bottles are a hit here, too! Yes, you should be able to find the bleeding art tissue paper at your craft store. At ours it is in the kids’ craft section.
Megan Schiller
Love these photos! I used to do this all the time with my toddler art classes. We’ve also tried it with the circle and square shaped tissue paper from discount school supply. Kids can lay down the shapes into a design and spray away. It makes for a good variation on this great project.
Shaunna
Thanks for the suggestion, Megan. We’ll have to try that…a great activity for my toddlers who are learning shapes now. 🙂
Katie @ Gift of Curiosity
LOVE THIS! Pinning to do with my kids. They would love using the water bottle, and I had no idea the end result would be so gorgeous!
Shaunna
I really how had no idea either! I think you could come up with some very neat color combinations with a little experimenting. Later this week I’ll be sharing a couple of crafts we made using this technique.
Sarah @ How Wee Learn
I have never seen this before! Something I will definitely be trying with my wee ones. This would make beautiful wrap for Christmas presents! Thanks for the inspiration.
Shaunna
It’s really fun! And even toddler-friendly…my little one loved it. I’ll be sharing one of her creations tomorrow. What a neat idea for wrapping paper. I wonder if thinner paper will hold up to the water. You’ll have to let me know if you try it.
Anna@The Measured Mom
Beautiful – something my kids would love to try, I’m sure! Did you get a new header recently? It looks great!
Shaunna
Thank you! My husband made the header this weekend. Isn’t it gorgeous? I feel so “official” now with an actual header after a year..ha! Thanks for noticing the change.
Lynda
Shaunna, Thanks so much for sharing my tutorial. Fun for even us big kids! Thanks again for the link.
Shaunna
Thanks so much for the great tutorial! And I love the idea of using the technique on fabric…sensing a little big kid crafting in my future. 🙂