Halloween is the perfect time to get spooky-creative by reversing the traditional painting process. Instead of adding paint with brushes or other tools let’s flip the process by removing some of that paint to make Halloween art!
By using a subtractive art method we’ll discover what’s hidden underneath the surface. We’ll use combs, cups, and other supplies to erase the paint and “create by removing.” This process art activity promotes fine motor skill development, problem-solving skills, critical thinking, and exploratory art.
This activity is ideal for children of all ages and ability levels. Our youngest learners can explore by creating non-objective designs, shapes, and patterns while older children may enjoy drawing specific Halloween items. The possibilities are endless!
Flip the Painting Process: Create Halloween Art by Removing!

GET A FULL WEEK OF HALLOWEEN THEME ACTIVITIES IN OUR PRINTABLE PRESCHOOL LESSON PLANS

Flip the Process Halloween Art Materials:
- Tempera Paint – I love Crayola Premier Fluorescent Tempera
- Construction Paper
- Paintbrushes
- Combs (The dollar store sells multipacks for…$1.00!)
- Cups
- Plastic Forks
- Fake Fingers from Target’s Halloween Section

Process Art
Remember that the magic happens during the making! Process art puts the child in charge! It’s all about exploring, problem-solving, trying something new, experimenting, and creating freely without boundaries or rules. Let your child explore on their own and see what they come up with!
Step by Step Directions for this Halloween Art Project:
1. Speed Painting
Begin by painting the surface of the construction paper. Paint quickly and use an abundance of paint! You may even choose to squirt the paint directly onto the paper and spread it out with your brush to speed up the process.
2. Explore with Cups and Combs
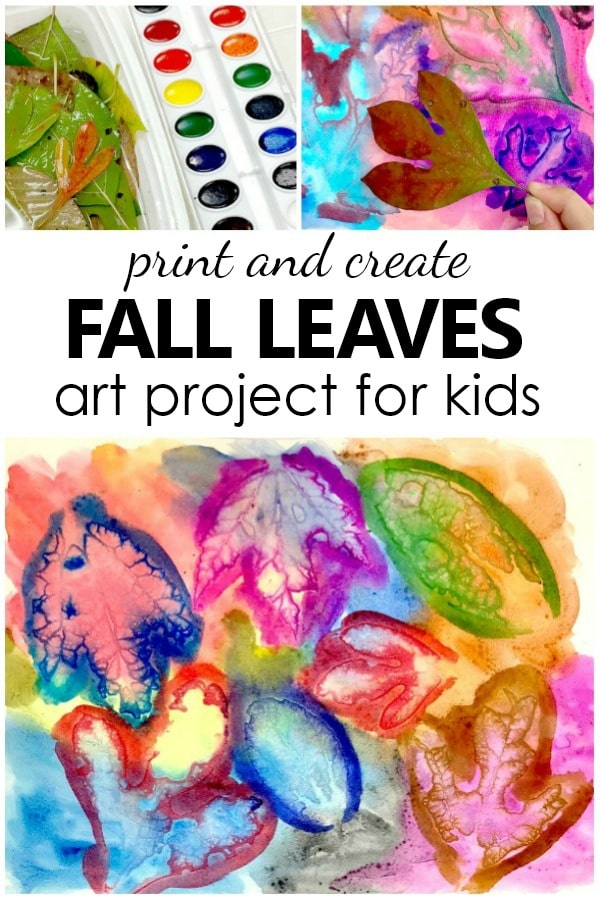
Use a cup to remove paint by putting the open end of the cup into the paint, twisting, and lifting it up. As a result, a circle is left behind. Try a variety of combs and rake them across the paint. What’s left behind is an array of lines. Ponder how combining the circles and lines could create a pumpkin, ghost, spider or cat.

3. Draw into the Paint
Use the cool fake finger to draw into the paint.

As you’re drawing you’ll be removing portions of the paint. If you draw a pumpkin, try using a plastic fork to give the pumpkin texture. Try overlapping your lines and shapes to create more interest.

Explore this process by using a variety of natural items to remove the paint including:
- Small Sticks
- Rocks
- Acorns
- Feathers
- Pinecones

Art and Literacy
The book The Pumpkin Book by Gail Gibbons is a great companion to this art activity. It describes the life cycle of a pumpkin while also explaining the origin and history of Halloween. Your child will love the many colorful and diverse jack o’ lantern illustrations throughout the book.

Talk About Art
1. What materials did you enjoy using the most?
2. What materials were the most challenging to use?
3. Can you identify texture in your artwork?
4. Can you find patterns in your artwork?
5. How many circles can you find in your artwork?
6. Compare and contrast using the manufactured items for removing paint vs. using natural objects.
7. What other items can you think of that would also work well to remove paint? Give it a try!

I hope you enjoy this creative art activity that upends the painting process. It’s a wonderful way to bring a variety of nontraditional art materials into your child’s workspace. It can enable one to think of “painting” in a whole new way!
CONNECT WITH VIN GIANNETTO
Learn more about Vin here on his author bio page. Follow along with him on Facebook at Young School Art with Mr. Giannetto and on Instagram @youngschoolartwithmr.g for art project ideas.
MORE ART AND CRAFT PROJECT IDEAS FROM VIN
Fall and Fall Holiday Art Projects for Kids
Click on the images below to see the full tutorial for each art project.


GET A FULL SET OF HALLOWEEN THEME ACTIVITIES

Watch this short video to see just a few examples of the types of activities and printables included in this set:
The 132-page Halloween Lesson Plan Set includes hands-on activities and these additional printables:
1) -at Word Family Bat Game (in color and b/w)
2) Candy Corn Science Experiment Recording Sheet (in color and b/w)
3) Candy Corn Uppercase, Lowercase, and Beginning Sound Picture Puzzles for Letters C, A, N, D, Y, H, O and R (in color and b/w)
4) Candy Corn Counting Cards 1-10 (in color and b/w)
5) Halloween Costume Syllable Sorting Activity (in color and b/w)
6) Haunted House Colors Board Game-3 variations to work on color recognition or color word recognition (in color and b/w)
7) “Look at the Costumes” Emergent Reader-3 variations
8) 0-35 Halloween Number Cards (in color and b/w)
9) Halloween Roll and Graph Math Game (in color and b/w)
10) Halloween Picture-Word Cards (in color and b/w)
11) Build a Jack-o-Lantern Pumpkin Mats and Shape Pieces
12) My Jack-o-Lantern Recording Sheets-2 variations, one to focus on shape recognition and one to focus on writing
13) Spider Number Mats and Ways to Show Numbers 0-10

Also available on Teachers Pay Teachers.
More Halloween Lesson Plan Sets
Leave a Reply